Tag Archives: veg

Building An Integrated Pest Management Plan – Part 3

By Phil Gibson
No Comments

This is the third in a series of articles designed to introduce an integrated pest management framework for cannabis cultivation facilities. To see Part One, click here. For Part Two, click here. Part Four comes out next week and covers direct control options for pest reduction. More to come!

This is Part 3: Preventive Measures

Preventive measures are a great investment in the profitability of your operations. Our objective is to ensure successful repeat harvests forever. Build your procedures with this in mind. This means maintenance and regular review. We all realize that this work can be monotonous drudgery (we know!), but these procedures will ensure your success.

Figure 1: New Air Shower Access Installation

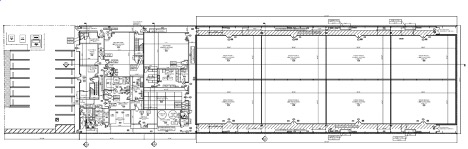
As a summary to begin, pest access must be limited wherever possible. Employees are the first place to start, but we must also return to our site map and review our facility design and workflows. Every operation has to move plants from nursery through harvest and post-harvest. Where should cleaning happen? Of course, you have to clean up post-harvest but when should this occur during the grow cycle? What is the best way to monitor and clean environmental management systems (i.e. air, water) and what are the weaknesses in the physical barriers between operations? Let’s walk through these issues one-by-one.

Employee Access and Sterile Equipment

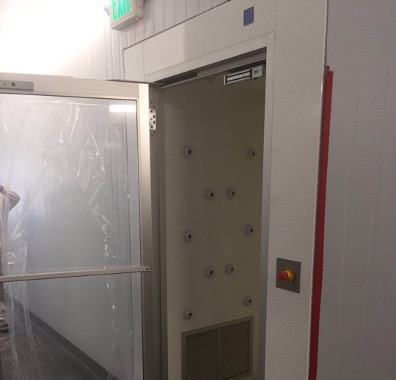
Follow procedures to screen and protect your employees both to eliminate pests and to avoid exposing your employees to harmful chemicals or storage areas. Look for ways to isolate your workflow from pest access. Be certain that your facility is airtight and sealed with filtration of molds, spores and live organisms in your air intake areas. Air showers at your access points are important to screen your employees on their way into your gowning areas and grow facility. Clothing should be standardized and shoe coverings or crocs should be provided for all employees that access your interior. Look for ways to stop all pests (embedded, crawling, hopping or flying) in all of your room assignments (mothers, clone, veg, flower, trim and drying). This can be improved with shoe baths, sticky mats, frequent hygiene (hand washing and cleaning stations) and procedures for entry.

Always consider requiring hair & beard nets, shoe covers and disposable gloves in plant sensitive areas.

Chemical Access & Protective Equipment

Figure 2: Example Facility Map – Understand Workflow & Barriers to Pest Access

Personal protection equipment (PPE) is very important to protect any employee that will come in contact with materials, liquids or vapors for chemical resources. Establish procedures for chemical use and train employees in the safe handling of these materials. Typical equipment includes high density chemical protective gloves, boots, respirators, Tyvek (or equivalent protective wear) suits and eye protection or goggles.

Chemical access areas and their use should be restricted to employees familiar with their authorized application. Always remember that cannabis is an accumulator plant, and it will absorb and hold onto chemical treatments. Appropriate isolation and safety procedures must be followed for chemical use. Not following these restrictions can expose your employees to dangerous chemicals or get your entire harvests rejected at testing.

Facility Map & Workflow

Because insects would like to be everywhere and they come in many types (root zone, crawling, flying, microscopic, bacterial or biofilm), the facility workflow must understand where they are and how they might migrate if they penetrate your defenses. Note airflows in your rooms and fan locations so migrations can be predicted once an infestation is located. Where are your opportunities for full clean-up and disaster recovery in your building? Where should you stage maintenance filters, test kits, water and cleaning materials. How best to clean up and dispose of sealed garbage containers or cleaning materials?

Operational Cleaning & Post-Harvest Reset

When compiling your preventative measure documents, it is critical to create a repeatable operating procedure for cleaning and sanitizing your rooms, systems, and growing spaces after each harvest. Plant material handling, cleaning surfaces and wipe methods should all be documented in your Standard Operating Procedures (SOPs). Define what “clean” is. Removing plants and plant debris is pretty clear but define how to drain reservoirs, clean pipes, change filters and clean and sterilize your rooms. Operators must be trained in these SOPs and reminded of their content on a regular schedule. This is how you avoid outbreaks that can crush your profits.

Physical Barriers & Maintenance

Figure 3: HVAC Air Filtration, Dehumidification, & Air Movement, Onyx Agronomics

Document your sealed spaces and define your normal room and access door barrier interfaces. Review the status of any known cracks or gaps in your perimeter. Are there any known leaks or piping that has been seen as a risk or a problem in the past? Are there any discoloring or resident mold locations (Never happens, right?). Baseline how much time and people resource a harvest operation and cleaning effort should take. Will you do this after every harvest or compromise your risk by delaying to every third or fourth harvest? Create your barrier SOP.

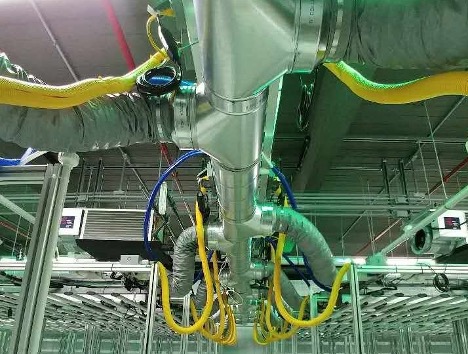
Environmental Control & HVAC

Managing the air quality provided to your plants is critical to your yields. Controlling CO2, air movement rates (the leaf happy dance), humidity, air filtration and sterilization methods must be maintained and cleaned on a regular basis. Do you need to change the HEPA or other particulate filters? Is there any UV light sterilization maintenance? We have all seen the home HVAC air conduit cleaning commercials. Your commercial facility is no different. How will you clean your air and water plumbing systems? How often will you perform this full reset? When will you calibrate and data log your sensors for temperature, humidity, CO2 and water resources? Put everything about your environmental set points into your maintenance document and decide when to validate these. Molds, mildews and biofilm hazards are all waiting for unmonitored systems to open the door for access.

In Conclusion, This Week

If you’re an IPM nerd and this dynamic topic did not put you to sleep, you can read more detail and examples for your integrated pest management procedures in ourcomplete white paper for Integrated Pest Management Recommendations, download the document here.

In our next chapter, Direct Control Options, we will review what you can use to protect or recover control of your facility including both chemical and non-chemical tools and methods. In our final two chapters, we will discuss extermination of the determined pests that breach your defenses. And with great expectations, our final chapter will discuss emergency response and time to go to war!

Part Four comes out next week. See you again soon!

The 3-Legged Stool of Successful Grow Operations: Climate, Cultivation & Genetics – Part 3

By Phil Gibson
No Comments

This is Part 3 in The 3-Legged Stool of Successful Grow Operations series. Click here to see Part 1 and here to see Part 2. Stay tuned for Part 4, coming next week.

The Right Build Out

Aeroponic & hydroponic systems grow plants at a highly accelerated rate. A “clean room” type of construction approach is the best way to manage this type of grow operation. Starting with a facility that is completely void of any kind of wood or materials that are porous is a good start. Cellulose materials collect moisture and encourage mold and mildew formation no matter how good the sealant.

We have seen cultivation spaces built out of dry wall over wooden post construction and studs that look sealed and solid on the outside of walls but when repaired for plumbing or other expansion work, they are black inside and covered with nasty mold that no one wants near their grow space.

Panel construction over steel frames or steel studs with skins is a safer, more sterile approach than retrofitting a wooden structure. Panel construction offers the added benefit of rapid assembly and minimal labor costs. We have seen 300 light rooms assembled in a few days so it is both very cost effective and safely sealed for protected growth.

Room Sizes & Count

How do you best fill this space if you have a clean slate?

If you have unlimited space, temperature and humidity management should determine the room sizes in your facility. Room sizes that are square in dimensions tend to be easier to maintain from an environmental standpoint. Long narrow rooms are good for fan airflow but tend to be more expensive from a cooling and dehumidification point of view. The larger the room, the more likely that you will get “microclimates” within the room which can challenge yield optimization.

Now, of course, many grows are retrofits of existing structures so compromises can be necessary. We have found that cultivators that have both very large and mid-size rooms in the same facility (200 lights versus 70 lights) are consistently more successful in the 70 light rooms. These “smaller rooms (~1,500 ft2) out-yielded and out-performed the larger rooms using the same genetics and grow plans. Compartmentalization also minimizes the risk in the case that a calamity (i.e. pest infestation) strikes the room. In a large room scenario, the losses can damage your operation. For this reason, we recommend 70-100 light/tub rooms as a standard.

Rooms should also follow your nursery economics. Structuring your nursery to produce just enough clones/veg plants for your next flower room avoids wasted plant material and resources. Breaking a larger space down into individual rooms means that you need fewer veg plants to fill your flower room that week. The best way to optimize this is to have a number of rooms that are symmetrical with the number 8 (typical 8-week cycle genetics).

With 8 rooms running flower, you are able to plant one room per week for 8 weeks. In the 9th week, you start over on room 1. This continuous harvest process is highly efficient from a labor standpoint and it minimizes the size of your mothers room (cost center). Additional space can be applied to your flower rooms. If you do not have infinite space, even divisors work just as well; 2 or 4 rooms can be planted in sequence for the same optimization (for 2-room structures, harvest and replant 1 room every 4 weeks for example). The optimal structure (8, 16, 24, or more rooms) enables you to optimize your profitability. If any of this needs further explanation, please just ask.

Not photoshopped: An “ideal” 70-tub flower room in a CEA greenhouse (courtesy of FarmaGrowers, South Africa)

Within your room choice, movable rows or columns of tubs/lights also provides optimal yields.  Tubs/plants can be moved together for light usage efficiency and one 3-foot aisle can be opened for plant maintenance. Racking systems or movable trays/tubs make this convenient nowadays.

Floors

Concrete floors offer pockets for bacteria to collect and smolder.  As such, they have to be sealed.  Proper application of your sealant choice is required so that it does not peal up or crack after sealing. There are many benefits to sealed floors that is discussed in the white paper. Floor drains are the equivalent of a portal to Hell for a sterile grow operation. Avoid them at all costs.

Phased Construction

Tuning or optimizing you grow rooms for ideal flowering operation depends on your location. Our advice is that you build and optimize your facility in phases with the expectation that nothing is perfect and you will learn improvements in every phase of expansion. The immediate benefit is production that you can promote to your sales channels and revenue that starts as soon as possible to improve your profitability. This is also an excellent learning curve to apply to subsequent rooms. Our happiest customers are those that learned construction improvements in early rooms that were able to be applied to following rooms without headache. The ability to focus on one or two rooms also allows you to get the recipe correct rather than just relying on “winging it”.

Don’t Be In A Rush To Go Green

A 70-tub flower room (courtesy of FarmaGrowers, South Africa)

Validate your water supplies and their stability. Verify that the water in your aeroponic or hydroponic feeds that get to your plants are clean and sterile. This is much easier in a step-by-step fashion than in a crisis debug mode once production is in progress. Be very cautious about incoming clone supplies. We will talk about this more in the next chapter on Integrated Pest Management but incoming clones are a top pest vector that can contaminate your entire facility.

Warehouse Versus Greenhouse Cultivation Spaces

As we started out, controlling your environment is your most important concern. We have seen success in both indoor rooms and greenhouses. The defining success factor is controlling humidity and temperature. Modern sealed controlled environment (CEA) greenhouses do this well and CEA is somewhat of a given for indoor grows. More details on this in the white paper.

Packaging these recommendations gets you to the perfect body for your Formula 1 race car. Now, you are ready to look at some of the mechanics of protecting your operation from pesky little critters and biologicals that can derail your operation and weaken your engine.

Before we sign off this week, I wanted to highlight the ultimate build-out that we have seen so far.  Of course, there are many challengers that have done this well but at this point, FarmaGrowers in South Africa has the best thought out facility we have seen. They acquired Good Manufacturing Practice (GMP) & Good Agricultural & Collection Practice (GACP) certification early in their operations due to very well-thought-out designs. They are exporting to global markets without irradiation today. Certainly, many successful customers have beautifully thought-out operations and there are several upcoming facilities that offer amazing planning that will challenge for this crown, but for now. FarmaGrowers leads the pack in this aspect. See here for a walkthrough.

To download the complete guide and get to the beef quickly, please request the complete white paper Top Quality Cultivation Facilities here.

Stay tuned for Part 4 coming next week where we’ll discuss Integrated Pest Management.