Tag Archives: LC

An Evaluation of Sample Preparation Techniques for Cannabis Potency Analysis

By Kelsey Cagle, Frank L. Dorman, Jessica Westland
No Comments

Sample preparation is an essential part of method development and is critical to successful analytical determinations. With cannabis and cannabis products, the analyst is faced with a very challenging matrix and targets that may range from trace level through percent level thus placing considerable demands on the sample preparation techniques.1 The optimal sample preparation, or “extraction”, method for potency analysis of cannabis flower was determined using a methanol extraction coupled with filtration using regenerated cellulose filters. 

In the United States (US), Canada, and other countries where medicinal and/or adult recreational cannabis has been legalized, regulatory entities require a panel of chemical tests to ensure quality and safety of the products prior to retail sales2. Cannabis testing can be divided into two different categories: Quality and Safety. Quality testing, which includes potency analysis (also known as cannabinoid testing or cannabinoid content), is performed to analyze the product in accordance with the producer/grower expectations and government regulations. Safety testing is conducted under regulatory guidelines to ensure that consumers are not exposed to toxicants such as pesticides, mycotoxins, heavy metals, residual solvents and microbial contaminates.

Potency testing evaluates the total amount of cannabinoid content, specifically focusing on tetrahydrocannabinol (THC) and cannabidiol (CBD). In the US, the biggest push for accurate total THC is to differentiate between hemp (legally grown for industrial or medicinal use), which is defined as cannabis sativa with a THC limit ≤ 0.3 %, and cannabis (Cannabis spp.), which is any cannabis plant with THC measured above 0.3 %3. Potency testing is typically performed by liquid chromatography (LC) with UV detection to determine the quantity of major cannabinoids.

In addition to reporting THC and CBD, their respective precursors are also important for reporting total potency. Tetrahydrocannabinolic acid (THCA) is the inactive precursor to THC while cannabidiolic acid (CBDA) is the precursor to CBD.4,5

Methods and Materials

Sample Preparation

All samples were homogenized using an immersion blender with a dry material grinder. The nominal sample amounts were 200 mg of flower, 500 mg of edibles, and 250 mg of candy samples.

Potency Extraction Method (1)

Twenty milliliters (mL) of methanol (MeOH) was added to each sample. The samples were mechanically shaken for 10 minutes and centrifuged for 5 minutes.

Potency Extraction Method (2)

Ten mL of water was added to each sample. The samples were mechanically shaken for 10 minutes. 20 mL of acetonitrile (ACN) was then added to each sample and vortexed. An EN QuEChERS extraction salt packet was added to the sample. The samples were placed on a mechanical shaker for 2 minutes and then centrifuged for 5 minutes.

Each extract was split and evaluated with two filtration/cleanup steps: (1) a regenerated cellulose (RC) syringe filter (Agilent Technologies, 4 mm, 0.45 µm); (2) a PFTE syringe filter (Agilent Technologies, 4 mm, 0.45 µm). The final filtered extracts were injected into the ultra-performance liquid chromatograph coupled with a photodiode array detector (UPLC-PDA) for analysis.

Figure 1: Calibration curve for THC potency

Calibration

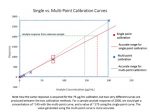
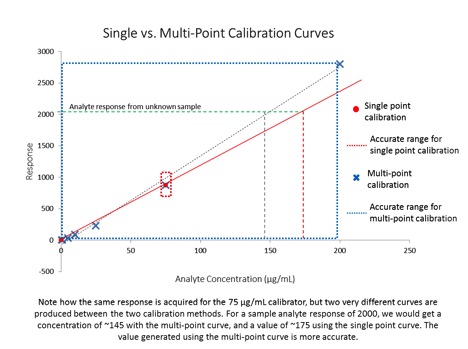
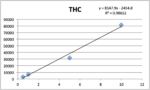
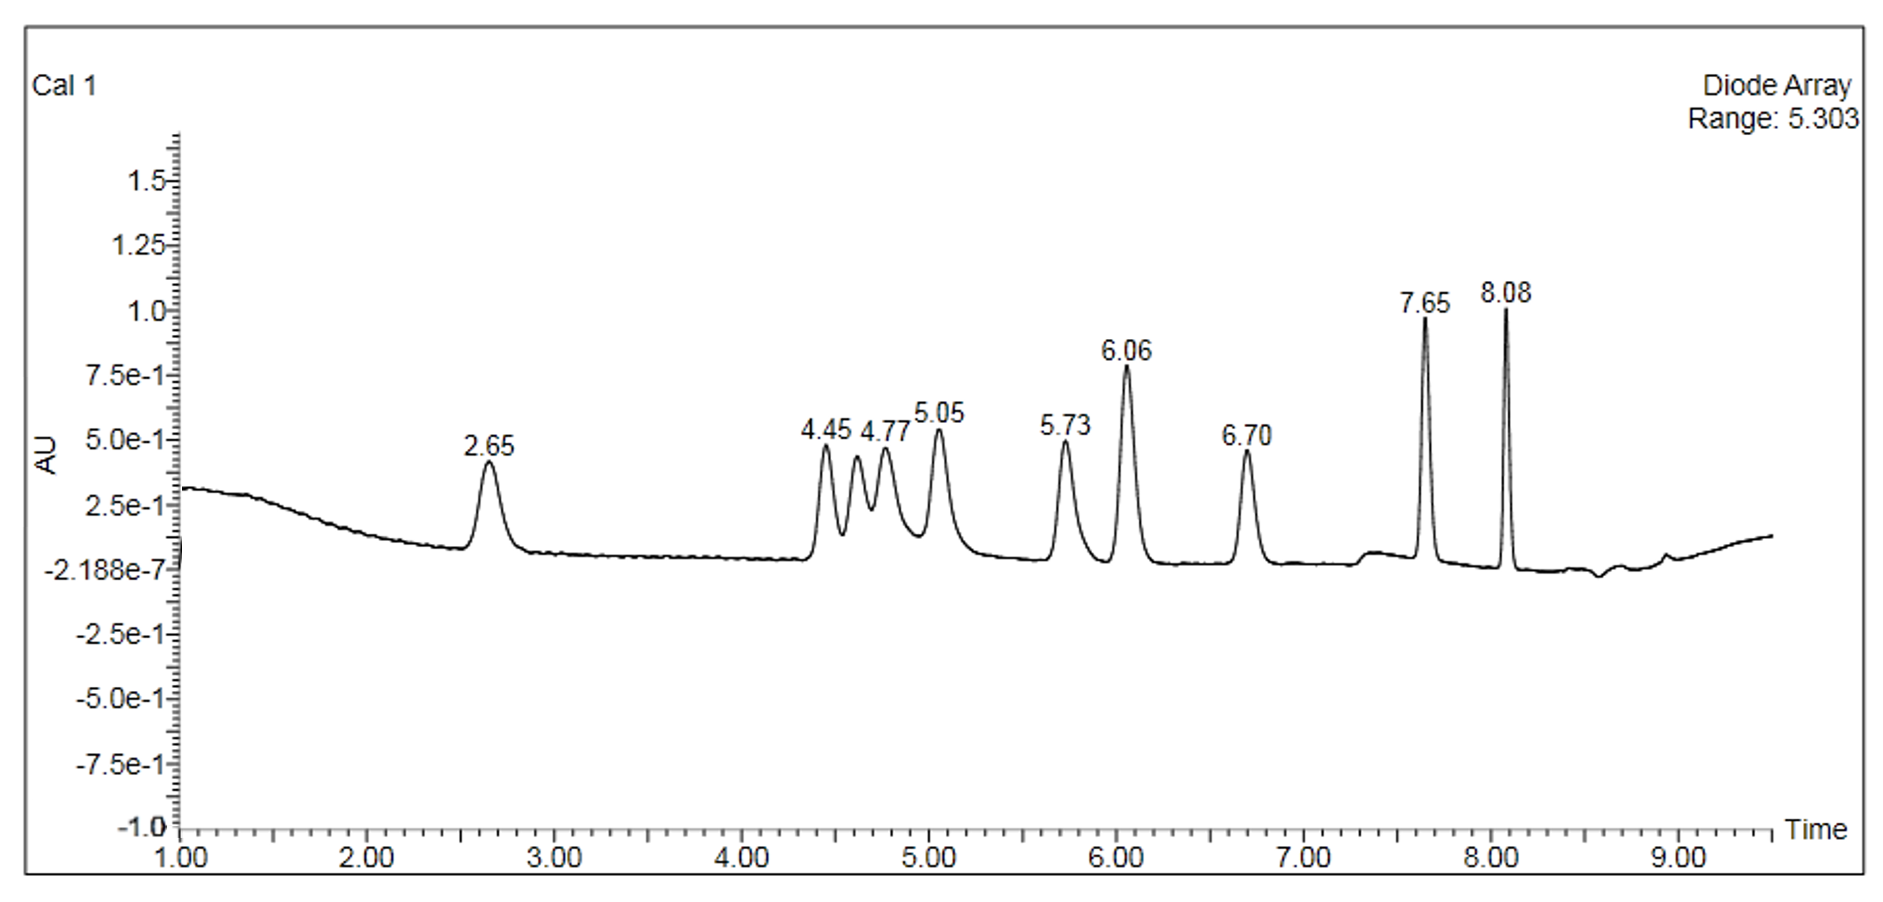
Standards were obtained for the following cannabinoids at a concentration of 1 mg/mL: cannabidivarin (CBDV), tetrahydrocannabivarin (THCV), cannabidiol (CBD), cannabigerol (CBG), cannabidiolic acid (CBDA), cannabigerolic acid (CBGA), cannabinol (CBN), tetrahydrocannabinol (9-THC), cannabichromene (CBC), tetrahydrocannabinol acid (THCA). Equal volumes of each standard were mixed with MeOH to make a standard stock solution of 10 ug/mL. Serial dilutions were made from the stock to make concentrations of 5, 1, and 0.5 ug/mL for the calibration curve (Figure 1).

Instrumental Method

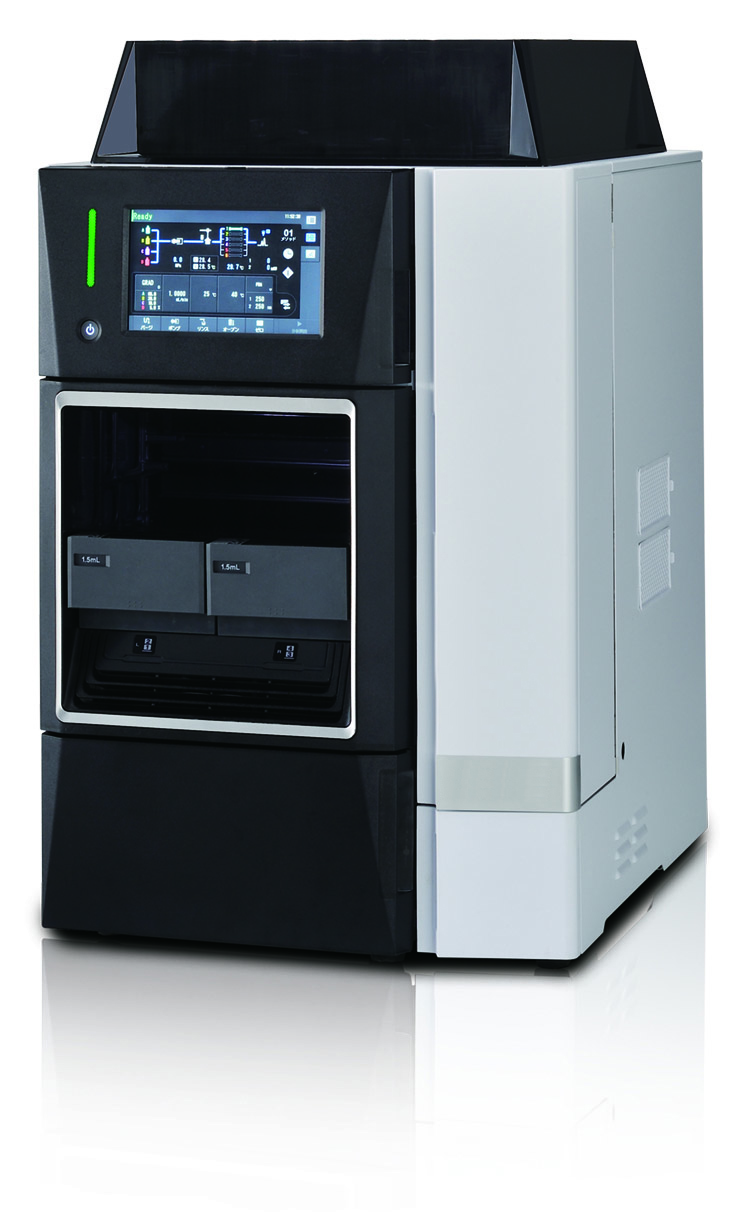
All instrument parameters were followed from Agilent Application Note 5991-9285EN.8 A UPLC with a PDA (Waters Corp, Milford, MA) detector was employed for potency analysis. An InfinityLab Poroshell 120 EC-C18, 3.0 x 50 mm, 2.7 um column (Agilent Technologies, Wilmington, DE) was utilized for compound separation. The organic mobile phase composition was 0.05 % (v/v) formic acid in HPLC grade MeOH and the aqueous mobile phase composition was 0.1 % (v/v) formic acid in HPLC grade water. The mobile phase gradient is shown in Table 1. The flow rate was 1 mL/min (9.5 minute total program), injection volume was 5 uL, and column temperature was 50 °C.

Table 1: LC mobile phase gradient for potency samples6

Discussion and Results

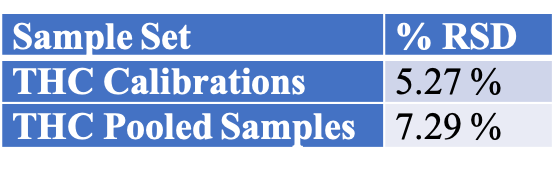
Table 2 summarizes the relative standard deviations (% RSD) were found for the THC calibrator (at 1 ug/mL) and one extract of a homogeneous sample (utilizing 7 replicates).

Table 2- %RSD values for the instrument response precision for THC in both the calibrations and the homogeneous extract.

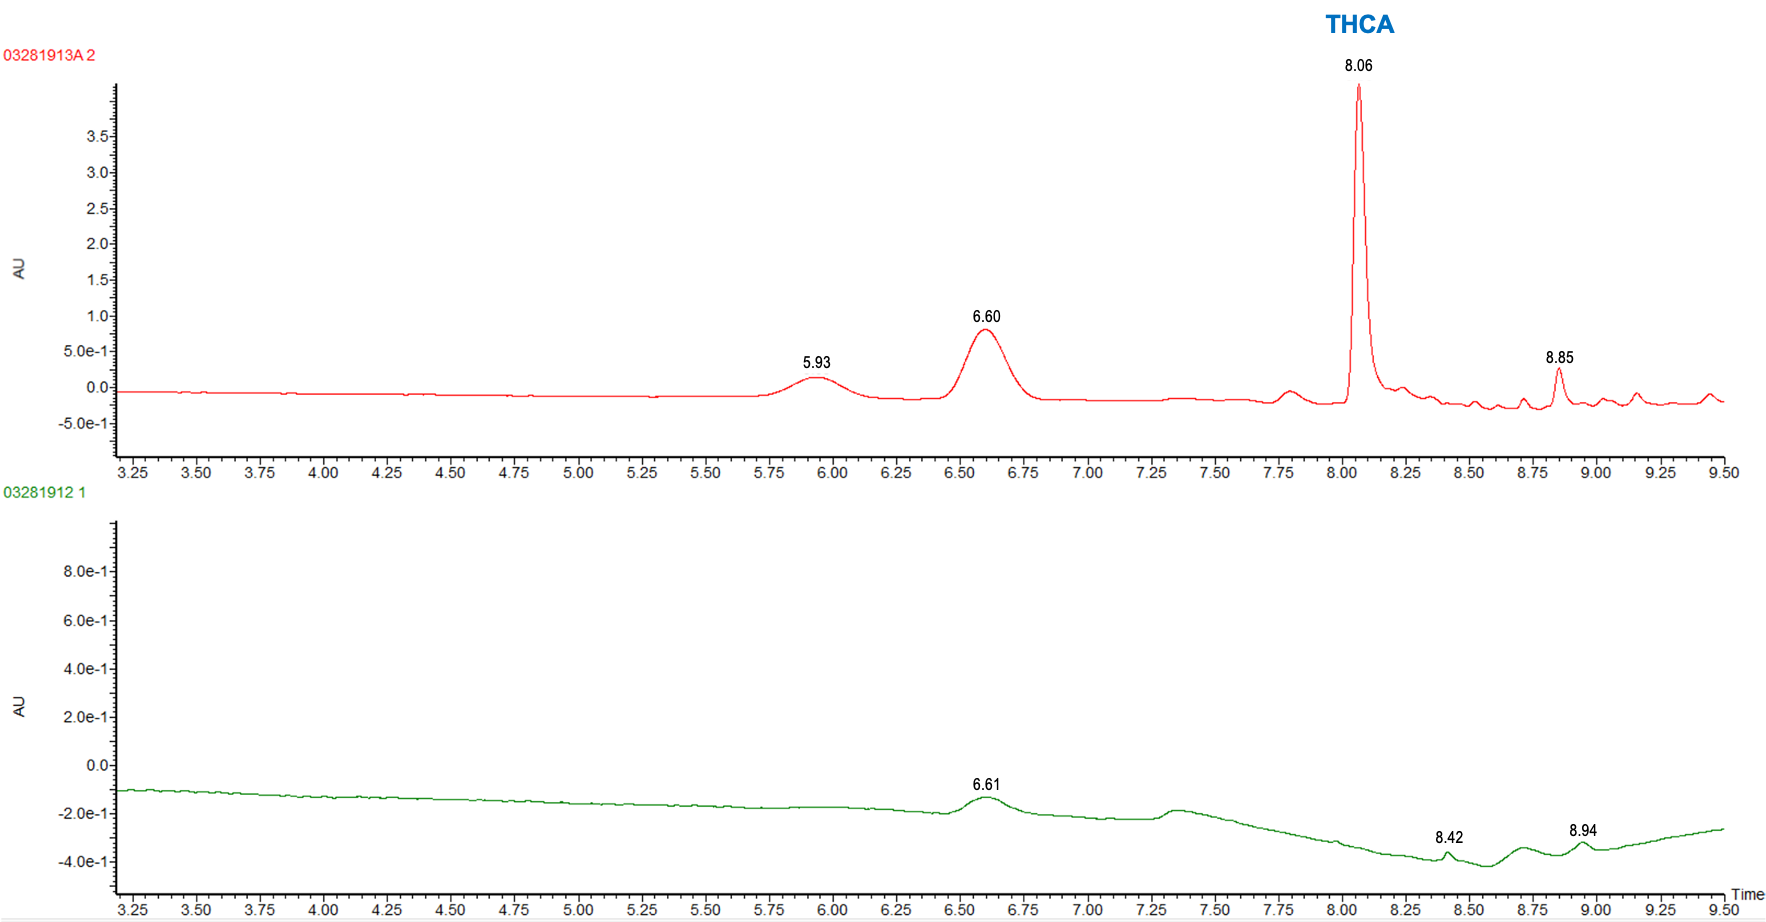
The cannabinoid potency of various cannabis plant and cannabis product samples were determined for the various extraction techniques In the chromatograms THC was observed ~8.08 minutes and CBD was observed ~4.61 minutes (Figure 2).

Figure 2: Chromatogram of the 10ug/mL calibrator for potency/cannabinoid analysis

Total potency for THC & CBD were calculated for each sample using the equations below. Equation 1 was used because it accounts for the presence of THCA as well as the specific weight difference between THC and THCA (since THCA will eventually convert to THC, this needs to be accounted for in the calculations).

Table 3 shows the % THC and the total THC potency values calculated for the same flower samples that went through all four various potency sample preparation techniques as described earlier. Figure 3 also provides LC chromatograms for flower sample 03281913A-2 and edible sample 03281912-1.

Table 3-THC and Total THC potency values for the same cannabis flower sample processed through the combination of extractions and cleanups.
Figure 3: Potency/Cannabinoid analysis chromatogram for flower sample 03281913A-2 (red trace) and edible sample 03281912-1 (green trace).

The results indicated that with the “Potency Extraction Method 2” (ACN/QuEChERS extraction) coupled with the RC filter provided a bias of 7.29 % greater for total THC % over the other extraction techniques. Since the other 3 techniques provided total THC values within 2% of each other, the total THC of the sample is more likely ~14%.

Since the sample dilution for the above data set reduced the CBD content, an undiluted sample was run and analyzed. This data is reported in Table 4.

Table 4- CBD and Total CBD potency values for the same cannabis flower sample processed through different sample preparation techniques.

The CBD results indicated that with the “Potency Extraction Method 1” (methanol extraction) coupled with RC filter, allowed for a greater CBD recovery. This may indicate the loss of CBD with an ACN/QuEChERS extraction.

With an average ~14% total THC and 0.06% total CBD for a homogenous cannabis flower sample, the optimal sample preparation extraction was determined to be a methanol extraction coupled with filtration using a regenerated cellulose filter. Since potency continues to remain at the forefront of cannabis regulatory testing it is important to utilize the right sample prep for your cannabis samples.


References

  1. Wang M, Wang YH, Avula B, Radwan MM, Wanas AS, Mehmedic Z, et al. Quantitative Determination of Cannabinoids in Cannabis and Cannabis Products Using Ultra-High-Performance Supercritical Fluid Chromatography and Diode Array/Mass Spectrometric Detection. Journal of Forensic Sciences 2016;62(3):602-11.
  2. Matthew Curtis, Eric Fausett, Wendi A. Hale, Ron Honnold, Jessica Westland, Peter J. Stone, Jeffery S. Hollis, Anthony Macherone. Cannabis Science and Technology, September/October 2019, Volume 2, Issue 5.
  3. Sian Ferguson. https://www.healthline.com/health/hemp-vs-marijuana. August 27, 2020.
  4. Taschwer M, Schmid MG. Determination of the relative percentage distribution of THCA and 9-THC in herbal cannabis seized in Austria- Impact of different storage temperatures on stability. Forensic Science International 2015; 254:167-71.
  5. Beadle A. CBDA Vs CBD: What are the differences? [Internet]. Analytical Cannabis. 2019 [cited 2020 Apr 22]; https://www.analyticalcannabis.com/articles/cbda-vs-cbd-what-are-the-differences-312019.
  6. Storm C, Zumwalt M, Macherone A. Dedicated Cannabinoid Potency Testing Using the Agilent 1220 Infinity II LC System. Agilent Technologies, Inc. Application Note 5991-9285EN

How to Develop Quality Cannabis Products with Advanced Analytical Testing

By Vanessa Clarke, Melody Lin
No Comments

A thorough cannabis product development process goes far beyond extracting and packaging. Performing advanced analytical testing at each and every stage allows producers to know the quantity, quality and behaviour of compounds in samples. Here are the four key stages from flower to consumption.

Stage 1: Flower

Developing a quality cannabis product begins with knowing the composition of compounds in your starting material. The best analytical tests utilize a metabolomics approach. Metabolomics is a suite of techniques that include a variety of instruments to run samples through in order to receive compositional data. In this stage, LC-qTOF and GC-MS are the best instruments to track all the compounds in the starting plant material. Essentially, metabolomics establishes a fingerprint of the compounds in a plant sample. This is beneficial because producers have to understand how their chosen cannabis plant differs from other cultivars and how it would potentially behave in their desired end product formulations.

Stage 2: Concentrate

After the plant material has gone through an extraction process, producers want to know precisely what is in the extract. Are there compounds that should not be there and are all the desired compounds present? The best way to test the quality of cannabis oils is again to use metabolomics (e.g. via LC-qTOF). This test reveals all the compounds in the sample in order to help the producer determine the purity and consistency of molecules beyond just THC and CBD.

When testing cannabis isolates, it is best to use NMR spectroscopy and X-ray diffraction. NMR characterizes and assesses the purity of single compounds or mixtures in solution or solid state. X-ray diffraction provides information about the crystal structure, chemical composition and the physical properties of the cannabis sample to help the producer prove the identification of desired compounds. Establishing that the concentrates are pure and aligned with what the producer intended to extract is key in this stage of product development.

Stage 3: Formulation

Designing an appropriate drug delivery formula is a universal challenge producers face at this stage of product development. Where nanoemulsion or other carrier approaches are being used, formulation characterization allows producers to understand how their active compounds behave in simulated physiological environments as well as how stable their products are over time. Specifically, nanoparticle sizing and assessing size changes over time can help a formulation scientist ensure the highest quality product is being mixed, and that the desired effect will be imparted on the consumer/patient.

Stage 4: Smoke/Vapor

Many producers might not consider this final stage, but it is critical for all inhalable cannabis products and devices. Using a smoke analyzer and metabolomics testing can identify and quantify compounds present within the formed smoke or vapor from pre-roll joints to vape devices. This is not only important for preventing the production of toxic by-products, but it can help producers create an optimal smoking experience for consumers.

One area that is often an afterthought is quality compliance testing. Despite a number of groups using the required tests well during development, many forget to continue the same robust testing on end products. In the current cannabis product development landscape, there is little guidance on how compliance testing should be conducted on every product “batch.” With these advanced analytical tests, producers can confidently develop compliant, stable and quality cannabis products.


Analytical Instruments You Need to Start a Cannabis Testing Laboratory

By Bob Clifford
8 Comments

The cannabis industry is growing exponentially, and the use of cannabis for medical purposes is being adopted across the nation. With this boom in cannabis consumers, there has been an increasing need for knowledge about the product.

The role of testing labs has become crucial to the process, which makes owning and operating a lab more lucrative. Scientists testing for potency, heavy metals, pesticides, residual solvents, moisture, terpene profile, microbial and fungal growth, and mycotoxins/aflatoxins are able to make meaningful contributions to the medical industry by making sure products are safe, while simultaneously generating profits and a return on investment.

Here are the key testing instruments you need to conduct these critical analyses. Note that cannabis analytical testing requirements may vary by state, so be sure to check the regulations applicable to the location of your laboratory.

Potency Testing

High-performance liquid chromatograph (HPLC) designed for quantitative determination of cannabinoid content.

The most important component of cannabis testing is the analysis of cannabinoid profiles, also known as potency. Cannabis plants naturally produce cannabinoids that determine the overall effect and strength of the cultivar, which is also referred to as the strain. There are many different cannabinoids that all have distinct medicinal effects. However, most states only require testing and reporting for the dry weight percentages of delta-9-tetrahydrocannabinol (Δ9-THC) and cannabidiol (CBD). It should be noted that delta-9-tetrahydrocannabinolic acid (Δ9-THCA) can be converted to THC through oxidation with heat or light.

For potency testing, traditional high-performance liquid chromatography (HPLC) is recommended and has become the gold standard for analyzing cannabinoid profiles. Look for a turnkey HPLC analyzer that delivers a comprehensive package that integrates instrument hardware, software, consumables and proven HPLC methods.

Heavy Metal Testing

ICP-MS instrument for detecting heavy metals in cannabis.

Different types of metals can be found in soils and fertilizers, and as cannabis plants grow, they tend to draw in these metals from the soil. Heavy metals are a group of metals considered to be toxic, and the most common include lead, cadmium, arsenic and mercury. Most labs are required to test and confirm that samples are under the allowable toxic concentration limits for these four hazardous metals.

Heavy metal testing is performed by inductively coupled plasma mass spectrometry (ICP-MS). ICP-MS uses the different masses of each element to determine which elements are present within a sample and at what concentrations. Make sure to include accompanying software that provides assistant functions to simplify analysis by developing analytical methods and automatically diagnosing spectral interference. This will provide easy operation and analytical results with exceptionally high reliability.

To reduce running costs, look for a supporting hardware system that reduces the consumption of argon gas and electricity. For example, use a plasma ignition sequence that is optimized for lower-purity argon gas (i.e., 99.9% argon as opposed to more expensive 99.9999%).

Pesticide Testing

The detection of pesticides in cannabis can be a challenge. There are many pesticides that are used in commercial cannabis grow operations to kill the pests that thrive on the plants and in greenhouses. These chemicals are toxic to humans, so confirming their absence from cannabis products is crucial. The number of pesticides that must be tested for varies from state to state, with Colorado requiring only 13 pesticides, whereas Oregon and California require 59 and 66 respectively. Canada has taken it a step further and must test for 96 pesticides, while AOAC International is developing methods for testing for 104 pesticides. The list of pesticides will continue to evolve as the industry evolves.

Testing for pesticides is one of the more problematic analyses, possibly resulting in the need for two different instruments depending on the state’s requirements. For a majority of pesticides, liquid chromatography mass spectrometry (LCMS) is acceptable and operates much like HPLC but utilizes a different detector and sample preparation.

With excellent sensitivity and ultra-low detection limits, LC-MS/MS is an ideal technique for the analysis of pesticides.

Pesticides that do not ionize well in an LCMS source require the use of a gas chromatography mass spectrometry (GCMS) instrument. The principles of HPLC still apply – you inject a sample, separate it on a column and detect with a detector. However, in this case, a gas (typically helium) is used to carry the sample.

Look for a LC-MS/MS system or HPLC system with a triple quadrupole mass spectrometer that provides ultra-low detection limits, high sensitivity and efficient throughput. Advanced systems can analyze more than 200 pesticides in 12 minutes.

For GCMS analysis, consider an instrument that utilizes a triple quadrupole mass spectrometer to help maximize the capabilities of your laboratory. Select an instrument that is designed with enhanced functionality, analysis software, databases and a sample introduction system. Also include a headspace autosampler, which can also be used for terpene profiles and residual solvent testing.

Residual Solvent Testing

Residual solvents are chemicals left over from the process of extracting cannabinoids and terpenes from the cannabis plant. Common solvents for such extractions include ethanol, butane, propane and hexane. These solvents are evaporated to prepare high-concentration oils and waxes. However, it is sometimes necessary to use large quantities of solvent in order to increase extraction efficiency and to achieve higher levels of purity. Since these solvents are not safe for human consumption, most states require labs to verify that all traces of the substances have been removed.

Testing for residual solvents requires gas chromatography (GC). For this process, a small amount of extract is put into a vial and heated to mimic the natural evaporation process. The amount of solvent that is evaporated from the sample and into the air is referred to as the “headspace.” The headspace is then extracted with a syringe and placed in the injection port of the GC. This technique is called full-evaporated technique (FET) and utilizes the headspace autosampler for the GC.

Look for a GCMS instrument with a headspace autosampler, which can also be used for pesticide and terpene analysis.

Terpene Profile Testing

Terpenes are produced in the trichomes of the cannabis leaves, where THC is created, and are common constituents of the plant’s distinctive flavor and aroma. Terpenes also act as essential medicinal hydrocarbon building blocks, influencing the overall homeopathic and therapeutic effect of the product. The characterization of terpenes and their synergistic effect with cannabinoids are key for identifying the correct cannabis treatment plan for patients with pain, anxiety, epilepsy, depression, cancer and other illnesses. This test is not required by most states, but it is recommended.

The instrumentation that is used for analyzing terpene profiles is a GCMS with headspace autosampler with an appropriate spectral library. Since residual solvent testing is an analysis required by most states, all of the instrumentation required for terpene profiling will already be in your lab.

As with residual solvent testing, look for a GCMS instrument with a headspace autosampler (see above). 

Microbe, Fungus and Mycotoxin Testing

Most states mandate that cannabis testing labs analyze samples for any fungal or microbial growth resulting from production or handling, as well as for mycotoxins, which are toxins produced by fungi. With the potential to become lethal, continuous exposure to mycotoxins can lead to a buildup of progressively worse allergic reactions.

LCMS should be used to qualify and identify strains of mycotoxins. However, determining the amount of microorganisms present is another challenge. That testing can be done using enzyme linked immunosorbent assay (ELISA), quantitative polymerase chain reaction (qPCR) or matrix-assisted laser desorption/ionization time-of-flight mass spectrometry (MALDI-TOF MS), with each having their advantages and disadvantages.

For mycotoxin analysis, select a high-sensitivity LC-MS/MS instrument. In addition to standard LC, using an MS/MS selective detector enables labs to obtain limits of detection up to 1000 times greater than conventional LC-UV instruments.

For qPCR and its associated needs, look for a real-time PCR amplification system that combines thermal cyclers with optical reaction modules for singleplex and multiplex detection of fluorophores. These real-time PCR detection systems range from economical two-target detection to sophisticated five-target or more detection systems. The real-time detection platform should offer reliable gradient-enabled thermal cyclers for rapid assay optimization. Accompanying software built to work with the system simplifies plate setup, data collection, data analysis and data visualization of real-time PCR results.

Moisture Content and Water Activity Testing

Moisture content testing is required in some states. Moisture can be extremely detrimental to the quality of stored cannabis products. Dried cannabis typically has a moisture content of 5% to 12%. A moisture content above 12% in dried cannabis is prone to fungal growth (mold). As medical users may be immune deficient and vulnerable to the effects of mold, constant monitoring of moisture is needed. Below a 5% moisture content, the cannabis will turn to a dust-like texture.

The best way to analyze the moisture content of any product is using the thermogravimetric method with a moisture balance instrument. This process involves placing the sample of cannabis into the sample chamber and taking an initial reading. Then the moisture balance instrument heats up until all the moisture has been evaporated out of the sample. A final reading is then taken to determine the percent weight of moisture that was contained in the original sample.

A moisture balance can provide accurate determination of moisture content in cannabis.

Look for a moisture balance that offers intuitive operation and quick, accurate determination of moisture content. The pan should be spacious enough to allow large samples to be spread thinly. The halogen heater and reflector plate should combine to enable precise, uniform heating. Advanced features can include preset, modifiable measurement modes like automated ending, timed ending, rapid drying, slow drying and step drying.

Another method for preventing mold is monitoring water activity (aW). Very simply, moisture content is the total amount of water available, while water activity is the “free water” that could produce mold. Water activityranges from 0 to 1. Pure water would have an aW of 1.0. ASTM methods D8196-18 and D8297-18 are methods for monitoring water activity in dry cannabis flower. The aW range recommended for storage is 0.55 to 0.65. Some states recommend moisture content to be monitored, other states monitor water activity, and some states such as California recommend monitoring both.

Final Thoughts

As you can see, cannabis growers benefit tremendously from cannabis testing. Whether meeting state requirements or certifying a product, laboratory testing reduces growers’ risk and ensures delivery of a quality product. As medicinal and recreational cannabis markets continue to grow, analytical testing will ensure that consumers are receiving accurately

labeled products that are free from contamination. That’s why it is important to invest in the future of your cannabis testing lab by selecting the right analytical equipment at the start of your venture.

extractiongraphic

The Four Pillars of Cannabis Processing

By Christian Sweeney
2 Comments
extractiongraphic

Cannabis extraction has been used as a broad term for what can best be described as cannabis processing. A well-thought-out cannabis process goes far beyond just extraction, largely overlapping with cultivation on the front-end and product development on the back-end1. With this in mind, four pillars emerge as crucial capabilities for developing a cannabis process: Cultivation, Extraction, Analytics and Biochemistry.

The purpose and value of each pillar on their own is clear, but it is only when combined that each pillar can be optimized to provide their full capacities in a well-designed process. As such, it is best to define the goals of each pillar alone, and then explain how they synergize with each other.

At the intersection of each pillar, specific technology platforms exist that can effectively drive an innovation and discovery cycle towards the development of ideal products.Cultivation is the foundation of any horticultural process, including cannabis production. Whether the goal be to convert pigments, flavors or bioactive compounds into a usable form, a natural process should only utilize what is provided by the raw material, in this case cannabis flower. That means cultivation offers a molecular feedstock for our process, and depending on our end goals there are many requirements we may consider. These requirements start as simply as mass yield. Various metrics that can be used here include mass yield per square foot or per light. Taken further, this yield may be expressed based not only on mass, but the cannabinoid content of the plants grown. This could give rise to a metric like CBD or THC yield per square foot and may be more representative of a successful grow. Furthermore, as scientists work to learn more about how individual cannabinoids and their combinations interact with the human body, cultivators will prioritize identifying cultivars that provide unique ratios of cannabinoids and other bioactive compounds consistently. Research into the synergistic effect of terpenes with cannabinoids suggests that terpene content should be another goal of cultivation2. Finally, and most importantly, it is crucial that cultivation provide clean and safe materials downstream. This means cannabis flower free of pesticides, microbial growth, heavy metals and other contaminants.

Extraction is best described as the conversion of target molecules in cannabis raw material to a usable form. Which molecules those are depends on the goals of your product. This ranges from an extract containing only a pure, isolated cannabinoid like CBD, to an extract containing more than 100 cannabinoids and terpenes in a predictable ratio. There are countless approaches to take in terms of equipment and process optimization in this space so it is paramount to identify which is the best fit for the end-product1. While each extraction process has unique pros and cons, the tunability of supercritical carbon dioxide provides a flexibility in extraction capabilities unlike any other method. This allows the operator to use a single extractor to create extracts that meet the needs of various product applications.

Analytics provide a feedback loop at every stage of cannabis production. Analytics may include gas chromatography methods for terpene content3 or liquid chromatography methods for cannabinoids 3, 4, 5. Analytical methods should be specific, precise and accurate. In an ideal world, they can identify the compounds and their concentrations in a cannabis product. Analytics are a pillar of their own due simply to the efforts required to ensure the quality and reliability of results provided as well as ongoing optimization of methods to provide more sensitive and useful results. That said, analytics are only truly harnessed when paired with the other three pillars.

extractiongraphic
Figure 1: When harnessed together the pillars of cannabis processing provide platforms of research and investigation that drive the development of world class products.

Biochemistry can be split into two primary focuses. Plant biochemistry focuses back towards cultivation and enables a cannabis scientist to understand the complicated pathways that give rise to unique ratios of bioactive molecules in the plant. Human biochemistry centers on how those bioactive molecules interact with the human endocannabinoid system, as well as how different routes of administration may affect the pharmacokinetic delivery of those active molecules.

Each of the pillars require technical expertise and resources to build, but once established they can be a source of constant innovation. Fig. 1 above shows how each of these pillars are connected. At the intersection of each pillar, specific technology platforms exist that can effectively drive an innovation and discovery cycle towards the development of ideal products.

For example, at the intersection of analytics and cultivation I can develop raw material specifications. This sorely needed quality measure could ensure consistencies in things like cannabinoid content and terpene profiles, more critically they can ensure that the raw material to be processed is free of contamination. Additionally, analytics can provide feedback as I adjust variables in my extraction process resulting in optimized methods. Without analytics I am forced to use very rudimentary methods, such as mass yield, to monitor my process. Mass alone tells me how much crude oil is extracted, but says nothing about the purity or efficiency of my extraction process. By applying plant biochemistry to my cultivation through the use of analytics I could start hunting for specific phenotypes within cultivars that provide elevated levels of specific cannabinoids like CBC or THCV. Taken further, technologies like tissue culturing could rapidly iterate this hunting process6. Certainly, one of the most compelling aspects of cannabinoid therapeutics is the ability to harness the unique polypharmacology of various cannabis cultivars where multiple bioactive compounds are acting on multiple targets7. To eschew the more traditional “silver bullet” pharmaceutical approach a firm understanding of both human and plant biochemistry tied directly to well characterized and consistently processed extracts is required. When all of these pillars are joined effectively we can fully characterize our unique cannabis raw material with targeted cannabinoid and terpene ratios, optimize an extraction process to ensure no loss of desirable bioactive compounds, compare our extracted product back to its source and ensure we are delivering a safe, consistent, “nature identical” extract to use in products with predictable efficacies.

Using these tools, we can confidently set about the task of processing safe, reliable and well characterized cannabis extracts for the development of world class products.


[1] Sweeney, C. “Goal-Oriented Extraction Processes.” Cannabis Science and Technology, vol 1, 2018, pp 54-57.

[2] Russo, E. B. “Taming THC: potential cannabis synergy and phytocannabinoid-terpenoid entourage effects.” British Journal of Pharmacology, vol. 163, no. 7, 2011, pp. 1344–1364.

[3] Giese, Matthew W., et al. “Method for the Analysis of Cannabinoids and Terpenes in Cannabis.” Journal of AOAC International, vol. 98, no. 6, 2015, pp. 1503–1522.

[4] Gul W., et al. “Determination of 11 Cannabinoids in Biomass and Extracts of Different Varieties of Cannabis Using high-Performance Liquid Chromatography.” Journal of AOAC International, vol. 98, 2015, pp. 1523-1528.

[5] Mudge, E. M., et al. “Leaner and Greener Analysis of Cannabinoids.” Analytical and Bioanalytical Chemistry, vol. 409, 2017, pp. 3153-3163.

[6] Biros, A. G., Jones, H. “Applications for Tissue Culture in Cannabis Growing: Part 1.” Cannabis Industry Journal, 13 Apr. 2017, www.cannabisindustryjournal.com/feature_article/applications-for-tissue-culture-in-cannabis-growing-part-1/.

[7] Brodie, James S., et al. “Polypharmacology Shakes Hands with Complex Aetiopathology.” Trends in Pharmacological Sciences, vol. 36, no. 12, 2015, pp. 802–821.

The Practical Chemist

Building the Foundation of Medical Cannabis Testing – Understanding the Use of Standards and Reference Materials – Part 1

By Joe Konschnik
No Comments

In previous articles, you may recall that Amanda Rigdon, one our contributing authors, stated that instrument calibration is the foundation of all data quality. In this article, I would like to expand on that salient point. A properly calibrated instrument will, in fact, produce reliable data. It is the foundation we build our data upon. All foundations are comprised of building blocks, and our laboratory is no exception. If we take this analogy further, the keystone to the laboratory foundation, the stone that all data relies upon, is the analytical reference material. Proper calibration means that it is based on a true, accurate value. That is what the reference material provides. In this article, I would like to expand on the use and types of reference materials in analytical testing.

To develop sound analytical data, it is important to understand the significance of reference materials and how they are properly used. The proper selection and use of reference materials ensures the analytical certainty, traceability and comparability necessary to produce scientifically sound data. First, let’s take a moment to define the types of commonly used reference materials. According to the International Vocabulary of Metrology (VIM), a Reference Standard (RS) is something that is reused to measure against, like a balance or a set of weights. A Reference Material (RM) is a generic term. It is described as something that is prepared using a RS that is homogeneous, stable and is consumed during its use for measurement. An example of an RM is the solutions used to construct a calibration curve, often referred to as calibration standards, on your GC or LC. Due to the current state of cannabis testing, reference materials can be hard to find and, even more critical, variable in their accuracy to a known reference standard. Sometimes this is not critical, but when quantifying an unknown, it is paramount.

RMs can be either quantitative or qualitative. Qualitative RMs verify the identity and purity of a compound. Quantitative RMs, on the other hand, provide a known concentration, or mass, telling us not only what is present, and its purity, but also how much. This is typically documented on the certificate that accompanies the reference material, which is provided by the producer or manufacturer. The certificate describes all of the properties of the starting materials and steps taken to prepare the RM. For testing requirements, like potency, pesticides, etc., where quantitation is expected, it is important to use properly certified quantitative RMs.

Now, the pinnacle of reference materials is the Certified Reference Material (CRM). VIM defines a Certified Reference Material (CRM) as an RM accompanied by documentation issued by an authoritative body and provides one or more specified property values, with associated uncertainties and traceability using valid procedures. A CRM is generally recognized as providing the highest level of traceability and accuracy to a measurement – the strongest keystone you can get for your foundation. It is also important to recognize that the existence of a certificate does not make a reference material a CRM. It is the process used in manufacturing that makes it a CRM, and these are typically accreditations earned by specific manufacturers who have invested on this level of detail.

Now that we understand the types of reference materials we can choose, in the next article of this series we will describe what a CRM provider must do to ensure the material and how we can use them to develop reliable data. Without properly formulated and prepared CRMs, instrument calibration and the use of internal standards are less effective at ensuring the quality of your data.


If you have any questions please contact me, Joe Konschnik at (800) 356-1688 ext. 2002 by phone, or email me at joe.konschnik@restek.com.

The Practical Chemist

Calibration – The Foundation of Quality Data

By Amanda Rigdon
1 Comment

This column is devoted to helping cannabis analytical labs generate valid data right now with a relatively small amount of additional work. The topic for this article is instrument calibration – truly the foundation of all quality data. Calibration is the basis for all measurement, and it is absolutely necessary for quantitative cannabis analyses including potency, residual solvents, terpenes, and pesticides.

Just like a simple alarm clock, all analytical instruments – no matter how high-tech – will not function properly unless they are calibrated. When we set our alarm clock to 6AM, that alarm clock will sound reproducibly every 24 hours when it reads 6AM, but unless we set the correct current time on the clock based on some known reference, we can’t be sure when exactly the alarm will sound. Analytical instruments are the same. Unless we calibrate the instrument’s signal (the response) from the detector to a known amount of reference material, the instrument will not generate an accurate or valid result.

Without calibration, our result may be reproducible – just like in our alarm clock example – but the result will have no meaning unless the result is calibrated against a known reference. Every instrument that makes a quantitative measurement must be calibrated in order for that measurement to be valid. Luckily, the principle for calibration of chromatographic instruments is the same regardless of detector or technique (GC or LC).

Before we get into the details, I would like to introduce one key concept:

Every calibration curve for chromatographic analyses is expressed in terms of response and concentration. For every detector the relationship between analyte (e.g. a compound we’re analyzing) concentration and response is expressible mathematically – often a linear relationship.

Now that we’ve introduced the key concept behind calibration, let’s talk about the two most common and applicable calibration options.

Single Point Calibration

This is the simplest calibration option. Essentially, we run one known reference concentration (the calibrator) and calculate our sample concentrations based on this single point. Using this method, our curve is defined by two points: our single reference point, and zero. That gives us a nice, straight line defining the relationship between our instrument response and our analyte concentration all the way from zero to infinity. If only things were this easy. There are two fatal flaws of single point calibrations:

  1. We assume a linear detector response across all possible concentrations
  2. We assume at any concentration greater than zero, our response will be greater than zero

Assumption #1 is never true, and assumption #2 is rarely true. Generally, single point calibration curves are used to conduct pass/fail tests where there is a maximum limit for analytes (i.e. residual solvents or pesticide screening). Usually, quantitative values are not reported based on single point calibrations. Instead, reports are generated in relation to our calibrator, which is prepared at a known concentration relating to a regulatory limit, or the instrument’s LOD. Using this calibration method, we can accurately report that the sample contains less than or greater than the regulatory limit of an analyte, but we cannot report exactly how much of the analyte is present. So how can we extend the accuracy range of a calibration curve in order to report quantitative values? The answer to this question brings us to the other common type of calibration curve.

Multi-Point Calibration:

A multi-point calibration curve is the most common type used for quantitative analyses (e.g. analyses where we report a number). This type of curve contains several calibrators (at least 3) prepared over a range of concentrations. This gives us a calibration curve (sometimes a line) defined by several known references, which more accurately expresses the response/concentration relationship of our detector for that analyte. When preparing a multi-point calibration curve, we must be sure to bracket the expected concentration range of our analytes of interest, because once our sample response values move outside the calibration range, the results calculated from the curve are not generally considered quantitative.

The figure below illustrates both kinds of calibration curves, as well as their usable accuracy range:

Calibration Figure 1

This article provides an overview of the two most commonly used types of calibration curves, and discusses how they can be appropriately used to report data. There are two other important topics that were not covered in this article concerning calibration curves: 1) how can we tell whether or not our calibration curve is ‘good’ and 2) calibrations aren’t permanent – instruments must be periodically re-calibrated. In my next article, I’ll cover these two topics to round out our general discussion of calibration – the basis for all measurement. If you have any questions about this article or would like further details on the topic presented here, please feel free to contact me at amanda.rigdon@restek.com.